Showing posts with label Resources. Show all posts

Trading

Few links to start with trading in India
Financial News papers/Magazines
Companies Research
Blogs
Mutual Funds
Others
IPOs

Capturing Microsoft Crash Dump

Steps to capture the Microsoft Crash Dump
Pre requisite
Machine should have 'Debugging tools for Windows' installed.If not download and install from this location : http://www.microsoft.com/whdc/devtools/debugging/installx86.mspx
Note:The above package will install windbg.Note the path of windbg.exe.we will use this to capture the crash dump
Steps
1]Open the Registry using Regedit
2]Open the following key "HKEY_LOCAL_MACHINE\SOFTWARE\Microsoft\Windows NT\CurrentVersion\AeDebug"
3]Take the backup of the AeDebug regisrty key.This is to restore the original settings once the crash dump is captured.
4]To take backup, right click on 'AeDebug' and select 'Export' option.Specify the name and location to store this.
5]Now set AeDebug\Auto key to 1
6]Set AeDebug\Debugger key to 
"" -p%ld -e%ld -g -c ".dump /mfa C:\\dump %ld.dump:q"
7]Try to reproduce the issue.On crash windbg will start and generate the crash dump file at C:\ location.
8]Restore the original settings by double clicking the file exported earlier in step 4

Table Indices

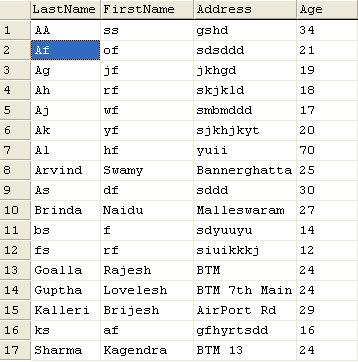
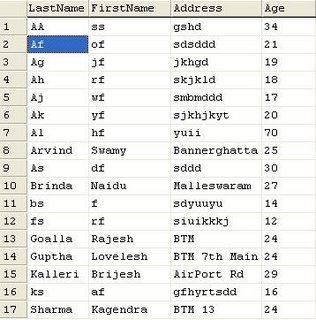
Consider the sample Table empTable and a select * from empTable fetched me the following results. It shows the rows are organized by the LastName column. For information, LastName is my Clustered Index key. For now this is the only index I have on this table.
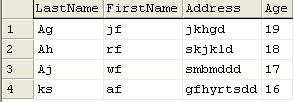
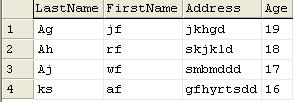
Now Issue the following query "select * from emptable where age BETWEEN 16 AND 19".This will fetch me the following data.
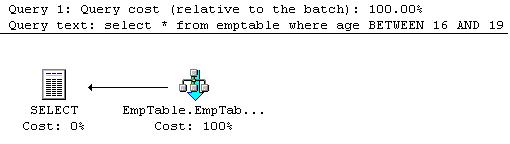
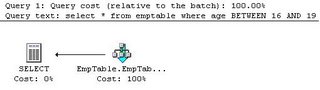
But the point of concern here is performance and the usage of indices.To knows it I enquired for the estimated execution Plan.

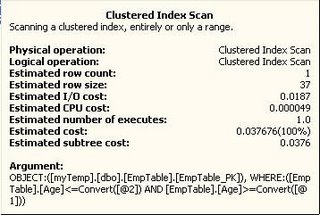
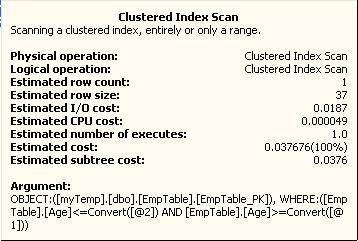
It shows as below: Here it is scanning the table which is organized by the Clustered index. This is very much similar to table scan. The cost field shows 0.03767 units.


With an Index on Age field

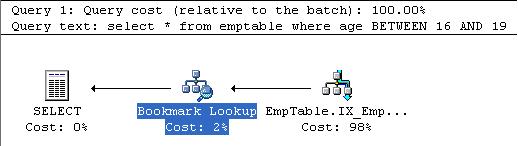
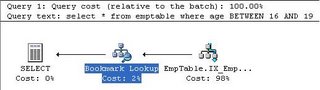
Try to create an index on the column Age. Issue the previous query again, now, the estimated execution Plan is shown as below. It is split into to two tasks
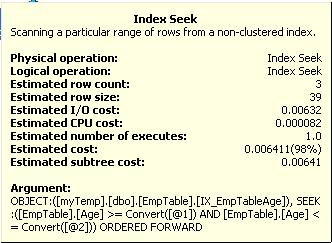
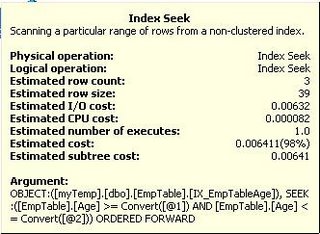
1) Index Seek
Index seek goes through the Index structure which we created for the column and notes down the ROWIDs or Clustering Keys of the rows in table matching the selection criteria.
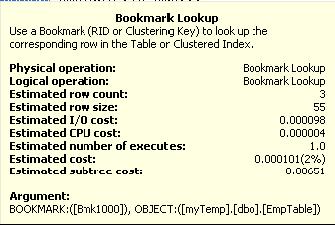
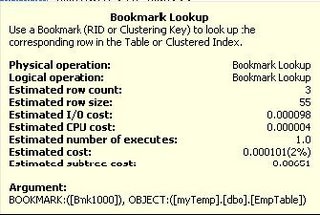
2) BookMark Lookup. Uses this ROWIDs or Clustering Keys to fetch the actual row in the table.
The cost field shows: 0.00651 units.


How it works

When the query is passed to the database, based on the columns in the WHERE clause fields are compared against existing indices. In our case the WHERE clause contains the age and it matches the just now created Index. So it is should be selected.

The index structure will usually be some variant of B/B+ tree, with each node contains a pointer called ROWID or Clustering Key pointing to the physical location of the row in the table. This pointer can be used during the BookMark Lookup phase to fetch the row.
Obviously going through the Tree structure is quicker compared to scanning the entire table. Hence using indices will improve the performance.

Ant Scripts

In this post I want to share few things about Ant Scripts.
Why do we need an Ant script
I feel the ultimate use of this scripting language is compiling/building a large collection of source files as a batch in a controlled manner.
What is an Ant Script An Ant script is an XML configuration file that calls out a target tree where various tasks get executed with the basic aim of building source files. Each buildfile contains one project and at least one (default) target. Targets contain task elements. Each task element of the buildfile can have an attribute and can later be referred to by the value supplied to this. The value has to be unique.
Target A Target holds a collection of tasks and may depend on other tasks. The dependency among the targets are specified using the depends attribute. Multiple targets can be specified using comma as separator. The flow of Ant project depends on the starting/First target that is called.
Commonly used targets are compile, test, clean etc.,
Example: Below one is a fine example that illustrates the flow and dependency among the targets.
target name="A"
target name="B" depends="A"
target name="C" depends="B"
target name="D" depends="C, B, A"
Suppose we call the target D first. The following holds good.
  • A is the first target that is executed
  • Order of execution is A->B->C and finally D.
  • Each target is executed only once.

Task A Task does the work of the Ant script, such as running javac, java etc.
Each Ant build project mainly contains two segments .First one that property setting section that specifies the classpath, Base directory etc and the Second one actual targets.

Installing Ant
Check whether Ant installed on your machine by running the command “Ant” in the command prompt. If it outputs something like this you need install Ant.

1)Ant download is not a installable application.It includes a set of executables,library files etc that can be copied to any desired location.
2)Ant can be downloaded from the Apache website that regulates it. Below is the pointer to it. Ant Download.
3)Now extract all the files to a directory.I usually extract them to "c:\Ant" directory.
4)Make sure Java is installed on your machine.( Say the path is " C:\jdk1.3.1")
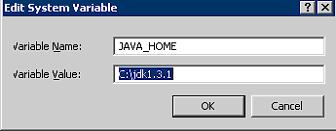
5)Now add these as part of the environment variables.To do it ,right click on the 'My Computer'.Navigate to 'Advanced Tab',Click 'Environment Variables' and try to add new.
6)Try to add the below two environment variables "ANT_HOME" and "JAVA_HOME".For assistance see the below pictures.


Now try to run the “Ant -v“at the command prompt. It should output the version.

Additional Plugin Jars
Ant doesn’t support certain tasks or attributes that are often needed in easy developing of build scripts. For example the task repeatedly executes a series of tasks that does compilation or execution. Ant doesn’t come with this support. So we need to add it to the library of jars in the ANT_HOME manually.
Here we need “ant-contrib-0.2.jar”. Here is the pointer to the jar file
http://cvs.sourceforge.net/viewcvs.py/xmoon/struts-demo/WEB-INF/lib/ .

Note: The above jar doesn’t support trim attribute.

Basics of Ant Usage
By now assume Ant s properly installed and the Paths are set properly. Now lets see how it can be used.
Ant is usually executed at the command prompt. The following points demo the usage of Ant.
1) By just running the Ant at the command prompt, it assumes Build.xml as the default argument and tries to run the build.xml file located in the current directory.
i.e. Ant at command prompt is similar to “Ant Build.xml”

2) To run a user defined build file say build_abc.xml the ‘-buildfile’ option need to be used.
Ex: Ant -buildfile build_abc.xml

3) Now lets see how the targets inside the build file are called once we invoke the buildfile.The first target with which the execution to be started is usually said using the default attribute in the project definition tag.
Ex: - <project name="EnterpriseOne" default="dist" basedir=".">
In the above case default attribute says dist is the first target to be called by default. Ant will determine the flow among the targets based on the depends attribute specified in the dist target.

4) To call a specific target, the name of the target should be specified as an argument.
Ex:
1) “Ant execute” asks the Ant to start with target execute first.(This is for default build.xml)
2) “Ant –buildfile build_abc.xml execute”, means the target named execute is called first from the build_abc.xml.

More Info
Ant Resources
Ant Download